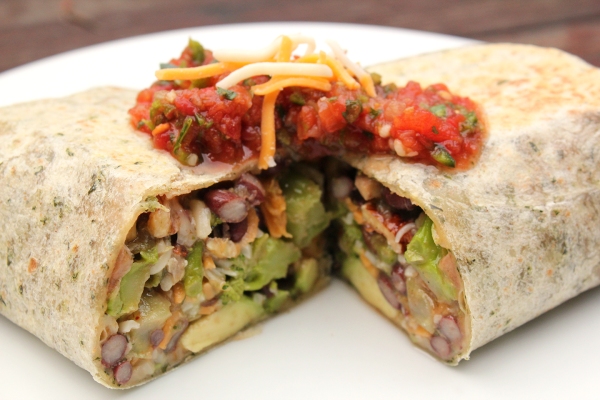
Quick Veggie Burritos

Quick Veggie BurritosThere’s nothing quite as quick and delicious as stopping by the local taqueria and picking up a couple of burritos. While it may be easy, those quick calories can start adding up on your waistline while depleting your wallet — or at least, that’s been my experience.

So, I decided to create something a bit healthier, though still pretty simple to make, and crafted a quick and tasty veggie burrito. I kept things inexpensive by using frozen veggies and prepped a few days of burrito fillings in advance so that I can spoon some mix into a tortilla and warm it slowly on the stove top soon after I get home from work. Not only are these almost as easy as dropping by the taqueria, they’re just as hearty, and they’re bursting with healthy vegetables. And seriously, these things are yummy!

Pair them with a nice ale or lager, or a white wine that can play nicely with all the different flavors, something like a Fumé Blanc.

Quick Veggie Burritos


Serves 4

high heat oil
garlic salt to taste
red pepper flakes to taste
1 cup chopped broccoli
1 cup mixed mushrooms
1 cup precooked butternut squash, cubed (I even got this frozen!)
4 Tablespoons canned tomatillos
1 cup canned black beans, drained and rinsed
2 Tablespoons sliced black olives
1 cup walnut pieces
handful of cheese (A combo of mozzarella and cheddar is nice. So is queso fresco.)
1 avocado, cubed
4 spinach wraps or other large tortillas

Preheat oven to 475 degrees F.
On a cookie sheet, scatter the broccoli, mushrooms, and squash in a single layer. Drizzle with oil and sprinkle with salt and pepper flakes. Cook until the veggies begin to brown, about ten minutes if they’re frozen, about five if they’re fresh.
Preheat a griddle or large pan over medium low heat.
Remove veggies from oven and put in a large bowl. Dump in the rest of the ingredients and stir together.
One by one, place tortillas on griddle and flip after a minute, leaving just long enough for the tortillas to be warmed and become more flexible.
Spoon approximately a cup of filling onto the middle-side of each tortilla. Fold tortilla and roll until a burrito is made.
Place on the griddle and cook on each side until lightly browned, about a couple minutes per side.
Serve with chips and salsa.
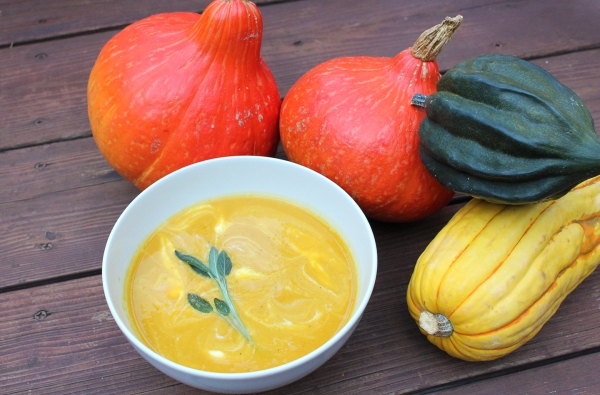
Winter Squash Soup

Winter Squash SoupYou ever spy a bunch of beautiful squash and end up buying them even though you have no idea what you’re going to make with them? No? Just me?

Well, that’s exactly what I did the other day. The winter squash had just been stocked, and it looked lovely. There was my favorite — red kuri squash, but while I was at it, the acorn and delicata looked good too, so…

Once I got them home, I thought the savory flavors of the kuri paired with the sweeter delicata and acorn would make a tasty soup. My instincts were right on. This is honestly in my top five recipe creations of all time. It was so good, rich and creamy and full of flavor. It will definitely be a regular player on the dinner table this winter. I paired it with a Paris Valley Road Chardonnay. While not usually a big Chardonnay fan, this wine was absolutely transformed by the soup, complimenting the sweetness and supporting the creaminess beautifully.

Winter Squash Soup


Serves 4-6

1 acorn squash
1 delicata squash
1 red kuri squash
2 Tablespoons butter
5 sage leaves
1 yellow onion, chopped
4 cloves of garlic, chopped
salt, pepper, and garam masala to taste
4 cups chicken stock (or vegetable stock to make this vegetarian.)
sriracha to taste

Preheat oven to 350 degrees F. Cut squash in half and remove strings and seeds. (I kept some seeds for next year’s garden.) Place cut-side down onto a cookie sheet lined with parchment paper and cook until a fork can slide into it, about 20 minutes.
Let cool. Scoop out the squash flesh from the skin. (I did this the night before and kept the squash in a reclosable bag in the fridge until I was ready for the next step.)

On the stove top, heat a saute pan over medium-low. Add the butter and sage and swirl around the pan until butter begins to turn a light brown. Remove from heat and pour into a bowl.

Return pan to stove, turn heat up a bit, and cook onion, garlic, salt, pepper, and garam masala until onions begin to turn translucent. Turn off heat.

In a blender or food processor, mix squash, butter and sage, onion mixture, and stock a little at a time (Probably around two cups each try) until everything is blended smooth. Pour blended mixture into a large pot and continue until everything has gone through the cycle.

Place pot back on the stove and reheat on low until soup begins to slowly bubble. Stir in a squeeze or so of sriracha for a bit of heat, and taste to see if any other spices need to be adjusted.

Spoon into bowls and serve with some crusty sourdough bread.

Pumpkin Quesadillas

pumpkin quesadillaI told you when I learned about that awesome cooking method for winter squash that I’d be using it a lot.

American readers, how was your Thanksgiving? I managed to fill myself up on assorted vegetables and cheeses from the platter I brought for pre-dinner snacking (my family does a potluck type Thanksgiving meal) and ended up being the perfect amount of full without going over when it came to turkey hour.

How was everyone else’s weekend? Because I work in the natural food industry, and so much of my focus last week was on, “Try this. How about this recipe? Have you purchased you turkey?” type promotions, I was all food-ed out after the day of giving thanks and worshiping turkey was over. Of course, food is my passion, so I wasn’t dreaming of take-out for long.

And suddenly, here’s December. It’s cold. It’s snowing. Electricity at the house and at work has become a chancy thing, so I put together a filling, taste-sensation type of meal that is easy to assemble — even if you’re doing it by candlelight.

Pumpkin Quesadillas

Serves 2-3 people, depending on appetite

1 sugar pie pumpkin or other winter squash, cooked (I used a kuri squash. A can of pumpkin puree would work, too.)
½ cup soft, white cheese like queso fresco (I used Laychee from Pennyroyal Farm. A white cheddar would also work if you didn’t have access to a softer cheese.)
¼ – ½ cup Hatch chiles or other green pepper, cooked and diced
½ cup black beans
Green salsa
4 Gluten-free tortillas
Pumpkin seeds for garnish

Warm up a griddle or large pan on medium heat. Lay 2 tortillas on griddle. Spread squash over the tortilla, going almost to the ends. Follow with a sprinkling of cheese, then chiles, then black beans. Cover with tortillas.
When the cheese has melted, carefully flip the quesadillas over and cook on the other side for 3-5 minutes.
Remove from heat and cut quesadillas with a pizza cutter into wedges. Drizzle with green salsa and sprinkle with pumpkin seeds.

I paired this meal with Anchor Brewing’s Christmas Ale. It’s an amazing brew each year, and the 2013 did not disappoint. Man it’s a fantastic seasonal ale! If it’s available in your area, BUY IT. I look forward to it each December.

Kuri Squash and Bacon Soup

red-kuri-squash-soupFlu season is here, and I’ve already fallen prey to a strain that had me bedridden for most of a week. When I could eat again, I wanted something rich, filling, warm, and easy, as my stamina wasn’t back yet. Using my fab new technique to cook squash, I plopped in a couple of my favorite variety, Red Kuri, and took a nap.

Nap achieved, I had some beautifully cooked squash and no recipe bubbling up into my consciousness, so I did what every cook does when they want something but can’t find anything that quite satisfies the craving — I made it up. What was produced in my soup pot will be a dish I replicate quite often, as it was tasty with a capital T, and it was exactly what my recovering body needed.

Kuri Squash and Bacon Soup

serves four

2 Red Kuris, cooked, seeds and skin removed (If Kuris aren’t available, other winter squash, like sugar pie pumpkins or butternut, will work just fine.)
10 slices of bacon, cooked crispy and chopped
5 cups chicken stock
1 cup half and half
1 cup white wine (I used Chardonnay.)
Sriracha to taste (I used two healthy squeezes.)
2 teaspoons dried sage
salt and pepper to taste

Using a food processor, blend the squash and stock until smooth. You will need to do several batches so as not to overload the processor.
Dump in a soup pot and cook on medium heat until it begins to bubble. Add bacon, Sriracha, and sage. Stir well. Taste to see how much salt and pepper is needed and if you need to add more sage or Sriracha. Add wine and bring back to a slow simmer.
Pour in half and half and stir well. Taste once more to check and see if any final adjustments are needed. If all is to your liking, pour into bowls and enjoy.

Pairing notes: As I was recovering from the flu, I paired my soup with water. Another option would be using the wine that you used in the soup. Charles paired his bowl with a Pinot Noir and enjoyed it immensely.

Acorn Squash Lasagna

acorn squashRemember last week when I waxed poetic on winter squash? Well, today I’m going to share a recipe, a pairing, and an amazing tip that I received from my friends Joey and Bill.

The dinner party that Charles and I had attended at the aforementioned friends’ house had winded down. As we shared a bit of dessert and finished our wine, they shared with us their secret to cooking winter squash — the slow cooker. It’s easy, Bill told us, you just poke the squash with a fork a few times, stick it in the cooker — no water needed — turn it on low, and let it go.

Of course, I had to try it myself. I washed off an acorn squash, (it still had some farm dirt on it,) poked some holes in it with a fork, and stuck it in the slow cooker before I left for work. When I got home that afternoon, the house smelled heavenly, and the squash was cooked perfectly. So easy! Thanks to Joey and Bill’s tip, winter squash will now be a main ingredient in many a dinner in the months ahead.

My now cooked squash became the star of the evening meal, Acorn Squash Lasagna — one of my all-time favorite dishes. I’ve played with the recipe a few times over the years, tweaking it until I was perfectly happy with it. It’s savory and just a wee bit sweet and filling enough that a square will do you for your dinner requirements.

winePairing this lasagna has always been more of a challenge than cooking it, as the squash flavors and cheese flavors don’t always complement a wine well, but I finally found something that works wonderfully. It’s Ventana‘s Chardonnay, a wine that Charles had brought into the store on a vendor’s recommendation. He had brought home the last two bottles the week before. A side note — the psychology of shoppers is often interesting. Did you know that customers are uncomfortable with purchasing the last item on the shelf? Especially with wine and beer, that last bottle will just stand lonely on the shelf while people pass it by. Because of this, Charles often purchases the final hold-outs of wine vintages and seasonal beers. It works for us, as Charles stocks his shelves with excellent options, and our cellar becomes more and more diverse. But back to this particular pairing … the Ventana paired well, its creaminess rounding out the lasagna. Nutmeg characteristics in the glass were the perfect, seasonal accompaniment with the squash. The pairing just screams, “Autumn!”

lasagna
Acorn Squash Lasagna

serves two

1 acorn squash, cooked, seeds and skin removed
1/4 teaspoon dried, rubbed sage
salt and freshly ground pepper
8 ounces goat ricotta cheese
1/2 cup grated Parmesan
4 gluten-free lasagna noodles (I used Tinkyada Rice Lasagna)
1 egg, beaten
1 tablespoon butter

Preheat oven to 400 degrees F.
Cook lasagna noodles to package directions. I broke mine in half to fit the baking dish nicely.
Rub butter along the insides of a square baking dish.
Mix squash with sage, salt and pepper.
Mix ricotta with egg.
Place two lasagna pieces in the bottom of the dish. Spread with half of the squash.
Place two lasagna pieces on top, and spread with half of the ricotta mixture.
Repeat the lasagna-squash step, then the lasagna-ricotta step.
Sprinkle the top of your creation with the Parmesan, cover the dish with foil, and cook for 45 minutes. Remove the foil and cook for 20 more minutes.

  • Recent Posts

  • Archives

  • Categories

  • Meta