Quick Veggie Burritos

Quick Veggie BurritosThere’s nothing quite as quick and delicious as stopping by the local taqueria and picking up a couple of burritos. While it may be easy, those quick calories can start adding up on your waistline while depleting your wallet — or at least, that’s been my experience.

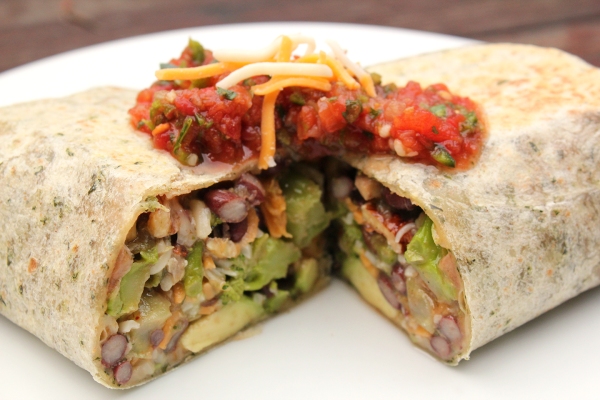
So, I decided to create something a bit healthier, though still pretty simple to make, and crafted a quick and tasty veggie burrito. I kept things inexpensive by using frozen veggies and prepped a few days of burrito fillings in advance so that I can spoon some mix into a tortilla and warm it slowly on the stove top soon after I get home from work. Not only are these almost as easy as dropping by the taqueria, they’re just as hearty, and they’re bursting with healthy vegetables. And seriously, these things are yummy!

Pair them with a nice ale or lager, or a white wine that can play nicely with all the different flavors, something like a Fumé Blanc.

Quick Veggie Burritos


Serves 4

high heat oil
garlic salt to taste
red pepper flakes to taste
1 cup chopped broccoli
1 cup mixed mushrooms
1 cup precooked butternut squash, cubed (I even got this frozen!)
4 Tablespoons canned tomatillos
1 cup canned black beans, drained and rinsed
2 Tablespoons sliced black olives
1 cup walnut pieces
handful of cheese (A combo of mozzarella and cheddar is nice. So is queso fresco.)
1 avocado, cubed
4 spinach wraps or other large tortillas

Preheat oven to 475 degrees F.
On a cookie sheet, scatter the broccoli, mushrooms, and squash in a single layer. Drizzle with oil and sprinkle with salt and pepper flakes. Cook until the veggies begin to brown, about ten minutes if they’re frozen, about five if they’re fresh.
Preheat a griddle or large pan over medium low heat.
Remove veggies from oven and put in a large bowl. Dump in the rest of the ingredients and stir together.
One by one, place tortillas on griddle and flip after a minute, leaving just long enough for the tortillas to be warmed and become more flexible.
Spoon approximately a cup of filling onto the middle-side of each tortilla. Fold tortilla and roll until a burrito is made.
Place on the griddle and cook on each side until lightly browned, about a couple minutes per side.
Serve with chips and salsa.

Fish Tacos

Fish TacosSometimes, there are healthier options, but I just don’t choose them. Such it is with fish tacos. I find them the most enjoyable when they’re beer battered and fried. I’ve had them grilled, and they’re tasty like that, but it’s just not what I think of when I’m craving fish tacos.

While frying foods isn’t the healthiest option, it should be pointed out that there are healthy aspects to this dish. 😉 Cabbage, avocados, salsa, white fish — these are good things, and I opted to use Greek yogurt instead of sour cream for the creamy cabbage taco topping. All this to say, there’s no harm in the occasional fried treat, as long as it’s just occasional.

Since my tilapia was beer battered, I paired dinner with a beer as well, Six Rivers Paradise Moon Coffee Porter. I used Anderson Valley Brewing Company’s Barney Flats Oatmeal Stout in the batter, so the Porter was a nice accompaniment.

Fish Tacos


Serves 2-4

1 tilapia filet
1 lime, cut in half
salt and pepper to taste
1 cup high heat sunflower oil
2/3 cup flour
8 ounces of beer
1 teaspoon garlic powder
4 corn tortillas
1 large avocado, peeled, pitted, and chopped
1/4 cup Greek yogurt or sour cream
2 Tablespoons chopped cilantro
1 Tablespoon chopped green onions
4 leaves of cabbage, chopped (savoy or Napa work well)

Put tilapia, juice from half the lime, and a pinch of salt and pepper in a plastic bag. Tie closed and shake contents. Place in refrigerator to marinate and “cook” (The acids from the lime will interact with the fish, rather like ceviche.) for about 30 minutes.
In a large skillet, heat oil over medium heat.
Prepare beer batter by mixing flour, beer, garlic powder, and a pinch of salt in a bowl until blended. It should be about the same consistency as cake batter. Tear fish into small pieces and submerge in the batter.
Carefully lay pieces in the skillet. There wasn’t quite enough oil in my skillet to submerge, so I cooked each side for about three minutes. You’ll know the fish is done when the batter has browned and turned crispy on the outside.
Lay fish on paper towels to soak up any extra oil.
One at a time, take the tortillas and submerge in the still hot oil and then flip over, cooking for about 30 seconds total. Remove to another paper towel to drain.
In a large bowl, add avocado, the juice from the other half of the lime, yogurt, cilantro, onions, and cabbage. Mix until cabbage is nicely coated.
Place fish inside each tortilla and cover with the creamy cabbage mixture. Fold tortillas in half, garnish with pickled carrots, jalapenos, and onions and add a dollop of salsa to the side.

Crab and Shrimp Nachos

crab and shrimp nachosIt’s Dungeness crab season in northern California, and it’s something of a tradition for coastal folks to have crab for their Christmas dinner.

While we moved inland a few years back, that doesn’t mean that Charles and I are willing to give up our coastal traditions. The store has been selling Dungeness precooked, which made our dinner preparations even easier this year, and since we are inland, it makes sense to sell them that way. While cooked and paired with a Beaujolais Nouveau or crafted into an amazing stew called Cioppino and served with hot sourdough bread are the traditional ways to consume this amazing crab, I — not surprisingly — did something slightly different this year. I combined the crab with precooked shrimp and made gooey, amazingly addictive, nachos.

I paired our meal with another West Coast tradition, Anderson Valley Brewing Company’s awesome seasonal beer, Winter Solstice. Its hints of toffee and spices went well with the rich flavors of the seafood and chevre, and its creamy mouthfeel was perfect with the melted cheese. Since tomorrow is Solstice, pick some up to toast in the returning light — and to pair with your own shellfish nachos.

Happy holidays, everyone! Cheers!

Crab and Shrimp Nachos


Serves 6

1 Dungeness crab, cooked and meat removed (Since I know most of my readers aren’t in northern California, canned crab can be substituted and will be just as tasty.)
1 handful of baby shrimp, cooked
1 Tablespoon butter
1/4 teaspoon nutmeg
3 Tablespoons chopped green onions
3 cloves of garlic, chopped
juice of one lemon
8 pepperoncinis, stems removed and chopped
2 roasted red bell peppers in olive oil, chopped
2 oz of chevre (I used Cypress Grove’s PsycheDillic®. The flavors were perfect.)
2 handfuls of shredded mozzarella
6 handfuls of tortilla chips

In a small pan, melt butter over low heat and toss in shellfish, nutmeg, green onions, and garlic. Stir until garlic becomes fragrant. Add lemon juice, pepperonchinis, and roasted red bell peppers and stir until well mixed.
Turn on broiler to high. Adjust the oven rack to be about six inches below the broiler.
Heap chips onto a cookie sheet. Scatter the contents of the pan, sprinkle on the mozzarella, and then top with the chevre. Place in the oven and cook until the cheese begins to bubble and turn golden brown.
Separate your cheesy, gooey mess evenly onto six dinner plates and serve right away.

Coconut Jasmine Rice

coconut riceYou know how sometimes you pick up a sauce and think, “I should just save myself the frustration and get take-out?”

Such was my experience last night. Charles had a sample of a Thai sauce and wanted to try it. I had an inkling it was going to be blah. I was right. To make sure our entire meal wasn’t ho-hum, I made coconut rice to pair with the yawn-worthy sauced-up chicken. It’s such a super-simple thing to make, tastes decadent, and compliments Thai food so nicely. We paired our dinner with the Belgian Pale Ale we brewed a few weeks ago. It was a good choice. If the sauce had been spicy, an off-dry Riesling would have been lovely, but since it wasn’t, the beer paired quite well.

Coconut Jasmine Rice


Serves 6

2 cups jasmine white rice
2 14 oz. cans of coconut milk
1 cup water
3 Tablespoons of shredded coconut
pinch of salt
coconut oil

Coat the inside of a deep soup pot with coconut oil. Make sure the pot has a lid that fits well.
Put all ingredients into the pot and set over medium-high heat. Stir.
When the liquid starts to boil, put on the lid and turn down the heat to low. Let rice simmer for 15 minutes. Take off lid and simmer for 5 minutes more, or until most of the liquid is gone.
Fluff the rice and cover again with the lid. Let sit while you make your main entree then fluff again right before serving.

BYOB: Brew Your Own Beer

Yolo BrewingIf you can bake a cake, you can brew beer.

And I’m not even talking an angel food cake, where you have to tiptoe through the kitchen as it bakes after combining the ingredients in exactly the right order in exactly the right way so the moody creation rises light and fluffy. Oh no, brewing beer is a lot more like throwing together a pound cake. You still need to follow the directions, but if you get a little extra vanilla extract in there, it’s not going to destroy the final product. Plus, you can listen to your punk turned up to 11 while it cooks.

My friends Eryn and Ellen met Charles and me at Yolo Brewing Company this last weekend to brew some Belgian Pale Ale. Our group had done this a few times before at Yolo’s last incarnation, Brew It Up. In the past, we crafted an Orange Blossom Blonde, an Irish Amber, a Pilsner, and created our own brew using an existing Brown recipe and adding peppers to it. It’s a great way to spend the day, eat some pub-type food, and visit – all while creating beer that you get to take home in a few weeks.

Yolo Brewing Company is located in West Sacramento inside a repurposed warehouse. The air is thick with the gorgeous smells of malt and hops as well as the tantalizing aromas of the dishes being offered up by the food trucks situated right outside the front doors.

A brewmaster guides each group through the process of making grains, water, hops, etc. into beer. We were lucky to be assigned to Phil, who had also worked in the Brew It Up days and had years of experience to share with us.
Measure
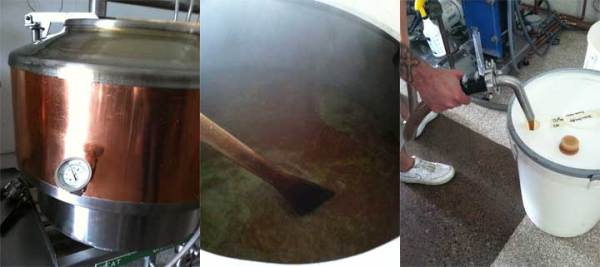
First, we got our grains. For our Belgian Pale Ale, that included Pilsner Malt, Munich, Vienna, Victory, and Carastan. Then we milled and mashed the grain. We ground the grain and put it into three bags, adding it to our kettle when the water was at 156 degrees F. The grains were steeped for 45 minutes and mashed every five minutes. To mash, you use a large, wooden paddle, stirring the liquid while carefully moving the bags around, a minute for each mash session. Then more heat was added to the kettle, until it reached 165 degrees. The bags were wrapped around the wooden paddle and squeezed out – well as much as was possible. Charles and Eyrn did an excellent job, and we should be treated to a little extra alcohol in our bottles thanks to their hard work.
Kettle Time
More water was then added to the beautiful copper kettle and heated to 180 degrees. After that, it was time for the extract! We used Brewers Gold Malt Extract. After measuring the proper amount, we set the pitcher of extract in a metal basket on top of the liquid in the kettle. The heat and steam quickly coaxed the extract into the roiling wort, and after a few minutes, it was time for hops!

There are three hop properties – bittering, flavoring, and aroma. Our bittering hops were Haller and Hersbru. Our flavoring were Saaz, and our aroma hops were a combination of all three. We used an Irish moss for our wort clarifier and an adjunct of clear candy sugar. This was our first beer that used sugar, and it was quite fun to — in essence — add rock candy to our brew. The bittering hops and moss were added first. Thirty minutes later, in went the flavoring hops. The aroma hops were added after the heat was turned off. Honestly, I can’t remember when we added the sugar. I was three pints in by that point – oops. That’s why you have a brewmaster keeping an eye on you. 😉

And there was our wort, beautiful and brown, tasting of roasted marshmallows. Because of the adjunct, this wort was sweeter than the ones we’ve tasted for previous brews.

A heat exchanger cooled the wort, and was then ready to be pumped into our barrel. For the last step, our yeast was added – 1214. Once the wort had been inoculated with our happy, beneficial yeast, it was time to cap off our bucket and wait. For our Belgian Pale Ale, that wait is five weeks. The only beer we’ve waited for longer was our Pilsner.

It’s so hard to be patient, but at the end of that time, we’ll return to bottle our glorious creation – all 12.4 gallons worth.

Slow Cooker Stout Chili

chiliI don’t know what it is about chili and summertime, but the two go together like best buds. While it’s a hot and spicy meal, it’s also really satisfying – even when the mercury is hovering around 100 degrees F.

Of course, since it is incredibly hot outside, I kept the temperature nice inside by using the slow cooker. It’s a perfect way to make chili, as the flavors have hours to slowly meld, incorporating the savory, sweet, and spicy into a taste bud pleasing whole.

Using stout in the chili is the perfect way to round out the flavors. It supports the malty, molasses flavors while complimenting the chipotle spice. Pair the dish with a summer beer, like Anderson Valley’s Summer Solstice (it was amazing with the chili) and a cornbread muffin, and this humble dish magically transforms to almost Manna-like proportions. Well, maybe not to that extent, but it is a pretty pleasurable dinner.

A quick note on the spice blend I used – it was Frontier’s Blackened Seafood Seasoning. Here’s the thing about “specific” seasonings – they’re still just a blend of herbs and spices. Don’t feel like it’s just for use on one type of meat. It’s a blend. Use it wherever you see fit. This specific seasoning would also be fantastic on chicken — or even tofu — and I used it on ground pork, which was perfect.

Slow Cooker Stout Chili


Serves 8

50 oz. canned kidney beans, drained and rinsed (If using dried beans, soak overnight.)
56 oz. canned fire roasted tomatoes, crushed (I used Muir Glen)
1 pound ground pork
22 oz. stout (I used Lagunitas Imperial Stout)
1 yellow onion, chopped
5 cloves of garlic, chopped
Hot sauce, to taste (I used O’Brother, That’s Hot Chipotle Habanero Pepper Sauce)
2 teaspoons salt
Spice blend, to taste

Brown pork in a skillet over medium-high heat. Shake in spice blend while pork is cooking. Add onion and garlic and stir. (I used a pork that wasn’t greasy, but if yours is, make sure to dab up the excess grease with a paper towel.)
Pour into a slow cooker, spreading it evenly over the bottom. Add beans, tomatoes, stout, hot sauce, and salt. Cover and cook on low for nine hours.
Taste and add more salt, spice blend, and hot sauce as needed.

Mexikale Salad

Mexikale SaladSummertime is salad time in our household. Why heat up the house with cooked food when there are so many fresh, local vegetables available? As a celebration for the abundance of summer produce, I tossed together a baby kale salad with ingredients inspired by Mexican food. It was tasty, if I do say so myself. Since this is my blog, I guess that’s rather redundant, but there you go. Why the bad pun title, you may ask? Well, when it comes to Mexican food married with California cuisine, laid out on a bed of kale — I just couldn’t help myself. Blame the journalism training.

This salad is perfect on its own, but if you wanted to get even fancier, you could add some crumbled, blue corn tortilla chips and a sprinkling of queso fresco to create a taco salad. Whichever way you go, serve this bad boy with a beer. We paired our dinner with a Big Sky Brewing Co. I.P.A. I’m not a fan of I.P.A.s that beat up your taste buds with hops, but Big Sky’s version has enough of a malty backbone to make for an enjoyable drinking experience.

Mexikale Salad


Serves 2

2 oz of baby kale salad mix
7 oz of black beans, drained and rinsed
1/2 cup of sweet corn kernels
1 large bell pepper, chopped into small pieces
1 large avocado, chopped
2 large tomatoes, chopped
1/4 cup red onion, chopped

1 teaspoon jalapeno pepper, finely chopped
juice from one lime
1 Tablespoon sour cream
1 teaspoon taco seasoning

chopped cilantro for garnish

Place veggies in a large bowl.
Put jalapeno, lime juice, sour cream, and taco seasoning in a jar with a lid. Shake until well mixed. Pour over the salad and toss until everything is coated. Divide into two bowls and garnish with cilantro.

Roasted Sriracha Cashews

Roasted Sriracha CashewsWho says fireworks are only for the sky? While the US’ Independence Day may have been yesterday, that doesn’t mean you can’t set off some food fireworks on your tongue — in the form of roasted sriracha cashews.

For an added layer of umami, I tossed the cashews in a teriyaki sauce before coating them in sriracha. The result was a bite of “Hello, spicy!” followed by savory and ending with the creamy characters of the cashew. What an addictive snack! Serve these with a beer, microbrew of course. A Pale Ale or Pilsner would be quite nice, tempering the spice and cutting through a bit of the fattiness of the nuts.

Roasted Sriracha Cashews


1 pound plain cashews
2 Tablespoons teriyaki sauce
2 Tablespoons sriracha sauce

Preheat oven to 350 degrees F.
In a large bowl, toss cashews with teriyaki sauce. Let sit for a couple of minutes.
Toss with sriracha sauce until fully coated and let sit another couple of minutes.
Line a baking sheet with parchment paper and spread the cashews in a single layer over the paper.
Roast for 20 minutes, stirring the cashews at the 5, 10, and 15 minute marks.
Remove from oven and allow the cashews to cool completely.

Eating Milwaukee

MilwaukeeI was in Milwaukee last week on a business trip. While most of the breakfasts and lunches were catered, dinner was up to us. I must say, I was very gastronomically pleased with Milwaukee. It was my first trip to the Midwest, and I wasn’t sure what to expect. No matter where I went for the evening’s cuisine, I left satisfied — with many the food coma to prove that I enjoyed my meal to the fullest.

Here are my top five eateries from my week in Milwaukee:

1. Wolf Peach
This was a can’t miss experience. I’m still reeling from the wonders of the evening, and it’s been a week and a half! Wolf Peach focuses on European dishes with a communal dining experience. Our party of ten was urged to order two dishes each and then share with the group. Everything was delectable in the extreme. Dishes of note: smoked bone marrow, the mixed charcuterie board, slow-poached egg pizza, deviled duck eggs, and roasted broccoli. I also enjoyed a Dragon’s Milk Bourbon Barrel Stout from New Holland Brewing while I waited for the rest of the party to arrive at the restaurant. It was amazing.

2. Umami Moto
Lovely sushi, and really tasty dessert, too! Dishes of note: tuna roll, the best unagi nigiri I’ve had in a long time (unagi is one of my most favorite things in the world), and their salmon roll.

3. Kil@wat
Located in the hotel, not only was this a welcome respite after a day of travel, the food was also fantastic. I ordered the rosemary polenta cake dinner. The slightly smoky polenta on top of a bed of baby arugula with goat cheese and a raspberry-balsamic reduction was divine. The waiter recommended a South African wine, Protea. Its black fruit and espresso flavors were balanced by lovely minerals and a bit of smokiness. It was perfect with dinner.

4. Water Buffalo
Recommended because it carries local ingredients, Water Buffalo made for a terrific last dinner in the city. I ordered the grilled Berkshire pork loin. The combination of the tarragon mashed potatoes with the apricot Dijon glaze that was drizzled on the pork — OMG delicious. They also served up the largest crème brûlée I have ever seen. Make sure to share it with a friend.

5. Café Calatrava
Found inside the Milwaukee Art Museum, this restaurant is surrounded by gorgeousness. After filling your soul with the museum’s great collections, sit in the cafe that’s situated right on the waterfront. I slowly savored a light lunch of fresh fish paired with ramps and a roasted wedge of polenta while hungrily gazing out at Lake Michigan.

Looking for more of my travel “Eating” blogs? Check out Winchester, Portland, Anderson Valley, and Healdsburg.

Sort-of Oaxacan Tostadas

tostadasCinco de Mayo is right around the corner, and any excuse to make Mexican food is reason enough to do it. So… let’s make tostadas!

A good tostada needs a good salsa. While freshly homemade salsa is best, it’s April, so that’s not really feasible. Tomatillos aren’t yet in season. There are some good pre-made salsa options, and if you’re in a bit of a time crunch, that may be your best option even if you’re making this dish in August. I chose a variety I knew from experience had good flavor with a bit of heat. A caveat — this tostada recipe isn’t as authentic as something you’d find in a Mexican restaurant. It’s still really tasty, though.

This meal is medium-hot on the spicy factor — the perfect reason to pair it with beer. A lighter style is your best option, be it lager, wheat, or pale ale. I opted for Lost Coast’s Tangerine Wheat. Its sweetness and crispness complimented the fatty chorizo and tempered the heat from the green salsa and the meat.

Tostadas


makes 12

12 small corn tortillas
1 jar green salsa
1 avocado, chopped
2 Tablespoons cilantro, roughly chopped
1 pound chorizo, casings removed
6 ounces queso fresco

Preheat a pan over medium heat. Cook chorizo until browned on all sides, breaking into small chunks as you stir.
While chorizo is cooking, add salsa, cilantro, and avocado to a bowl and mix well.
Crumble queso fresco into another bowl and set aside.
Drain cooked chorizo onto a plate lined with lots of paper towels in order to soak up the extra grease. Set aside.
Heat your stove top grill over medium high heat.
Place six tortillas on the grill, turning every 30 seconds until they begin to brown and puff up. Sprinkle chorizo onto the top of each tortilla. Allow the meat to warm and the tortilla to crisp. Remove from heat and repeat the process with the other six tortillas.
Sprinkle each tostada with queso fresco and then drizzle with the salsa mixture.
Serve with your beer of choice and plenty of napkins.

  • Recent Posts

  • Archives

  • Categories

  • Meta